Barometric Pressure (BMP180)
If you're following the Getting Started guide, then you'll already have this sensor set up and working. This page only exists here for the sake of users who want a bit more technical information on this sensor, or a more brief rundown of how to set it up quickly. You can read the First Sensor guide for a much less technical version of this page.
Wiring
Source files for this diagram are available here.
If you have something already connected to SCL and SDA on your Pi, don't panic! You can just connect to the same two pins for all I2C sensors, as I2C uses a method to communicate that allows it to use only two pins to communicate with many devices on the same "bus".
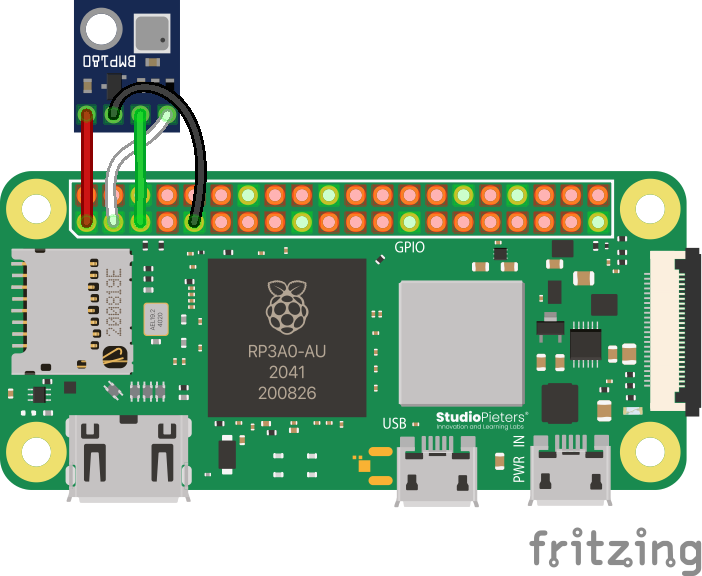
Note that this sensor may be unsoldered in your kit, but comes with Molex-style headers. You can also solder wires directly to it if neccesary. If you need help with solering, reach out on the Discord.
Code
Aerospace Jam rolls its own library for the BMP180. The source code is available, but it comes pre-installed in the SDK, so you don't really have to worry about it. Usage is relatively simple:
from bmp180 import BMP180

bmp = BMP180() # you can specify an I2C bus number with `bus_number=*`, but it defaults to 1, which is correct for the above wiring

temperature = bmp.get_temperature()
pressure = bmp.get_pressure()
altitude = bmp.get_altitude()

print(f"Temperature: {temperature} °C")
print(f"Pressure: {pressure / 100.0} hPa") # Convert Pa to hPa, which is directly equivalent to mbar
print(f"Altitude: approximately {altitude} m above sea level")
If run, this code will print the temperature, pressure, and estimated altitude that you're at. Easy peasy!
Troubleshooting
The BMP180 is an I2C sensor, and therefore, the disclaimer regarding I2C in the Appendix remains relevant. If you're still stuck, try giving the First Sensor guide a read, which goes into setting up this sensor in much more simple terms, and has a more in-depth troubleshooting section.
Advanced: How Altitude is Calculated
The BMP180 does not measure altitude directly. It measures pressure, and the library then calculates an estimated altitude based on that pressure reading. This is done using the barometric formula, which relates the change in atmospheric pressure to a change in altitude.
The key thing to understand is that this calculation requires a reference point: the pressure at sea level ().
The bmp.get_altitude() function uses a standard, internationally agreed-upon value for sea level pressure: Pascals. This is why the output is an "approximate" altitude. The actual local sea level pressure changes with the weather, so the altitude reading can fluctuate from day to day even if the sensor doesn't move.
Improving Accuracy for Relative Changes
While the absolute altitude reading may be off, the sensor is excellent for measuring changes in altitude. For example, if you want to measure how high your vehicle has climbed, you can improve accuracy significantly:
- Before launch, take a pressure reading on the ground. This will be your local reference pressure.
- Then, use it as your sea level: the library's
get_altitude()function has an optional parameter where you can provide your own sea-level pressure. By passing your ground-level pressure reading to this function, you are effectively setting "zero altitude" to be your starting point.
# Before launch
ground_pressure = bmp.get_pressure()
print(f"Ground pressure set to: {ground_pressure} Pa")

# ... some time later, in the air ...
current_altitude = bmp.get_altitude(sea_level_pressure=ground_pressure)

# This will now give you a much more accurate height above your launch point.
print(f"Altitude above ground: {current_altitude} m")
Advanced: Reading Pressure Manually
This section is for teams who are not using the SDK or who want to write their own sensor library in a different language. The following steps outline the I2C communication and the mathematical formulas required to get a pressure reading directly from the BMP180, based on the logic in our library. If you need more reference code, try reading it yourself, too!
These calculations are complex and based on the official Bosch datasheet. The process requires careful implementation of I2C read/write commands and specific integer arithmetic. For the ultimate source of truth, please refer to the Bosch BMP180 datasheet.
The process can be broken down into four main steps:
- Read the factory calibration data (only needs to be done once at startup).
- Read the uncompensated (raw) temperature value.
- Read the uncompensated (raw) pressure value.
- Use the calibration data and raw values to calculate the true temperature and pressure.
Step 1: Read Calibration Data
At startup, you must read 11 calibration values from the sensor's EEPROM. These are unique to each sensor.
| Variable Name | Register Address | Data Type |
|---|---|---|
AC1 | 0xAA | signed 16-bit |
AC2 | 0xAC | signed 16-bit |
AC3 | 0xAE | signed 16-bit |
AC4 | 0xB0 | unsigned 16-bit |
AC5 | 0xB2 | unsigned 16-bit |
AC6 | 0xB4 | unsigned 16-bit |
B1 | 0xB6 | signed 16-bit |
B2 | 0xB8 | signed 16-bit |
MB | 0xBA | signed 16-bit |
MC | 0xBC | signed 16-bit |
MD | 0xBE | signed 16-bit |
Store these values in variables to be used in the final calculations.
Step 2: Read Uncompensated Temperature (UT)
- Write the value
0x2Eto the control register0xF4. - Wait for at least 5 ms.
- Read 2 bytes (an unsigned 16-bit integer) from the data register
0xF6. This is yourUTvalue.
Step 3: Read Uncompensated Pressure (UP)
- Choose an oversampling setting (
oss), which determines the balance between accuracy and measurement time:ossValueControl Register Value Min. Wait Time 0 (ultra low power) 0x345 ms 1 (standard) 0x748 ms 2 (high resolution) 0xB414 ms 3 (ultra high res) 0xF426 ms - Write the corresponding "Control Register Value" from the table above to register
0xF4. - Wait for the "Min. Wait Time".
- Read 3 bytes from register
0xF6(MSB),0xF7(LSB), and0xF8(XLSB). - Combine them to get the raw pressure value
UPusing the formula:UP = ((MSB << 16) + (LSB << 8) + XLSB) >> (8 - oss)
Step 4: Calculate True Temperature and Pressure
Now, use the stored calibration data and the raw UT and UP values to get the final readings. These calculations rely only on optimizable, fast integer arithmetic, but works in a small unit that can be turned back into a float later.
A. Calculate True Temperature
X1 = (UT - AC6) * AC5 / 2^15X2 = (MC * 2^11) / (X1 + MD)B5 = X1 + X2TrueTemperature = (B5 + 8) / 2^4
The TrueTemperature result is in units of 0.1 °C. Divide by 10 to get degrees Celsius. The B5 value is also needed for the pressure calculation.
B. Calculate True Pressure
B6 = B5 - 4000X1 = (B2 * (B6 * B6 / 2^12)) / 2^11X2 = AC2 * B6 / 2^11X3 = X1 + X2B3 = (((AC1 * 4 + X3) << oss) + 2) / 4X1 = AC3 * B6 / 2^13X2 = (B1 * (B6 * B6 / 2^12)) / 2^16X3 = ((X1 + X2) + 2) / 4B4 = AC4 * (unsigned long)(X3 + 32768) / 2^15B7 = ((unsigned long)UP - B3) * (50000 >> oss)if (B7 < 0x80000000): p = (B7 * 2) / B4else: p = (B7 / B4) * 2X1 = (p / 2^8) * (p / 2^8)X1 = (X1 * 3038) / 2^16X2 = (-7357 * p) / 2^16TruePressure = p + (X1 + X2 + 3791) / 2^4
The final TruePressure value is in Pascals (Pa). You can now use this value for altitude calculations or other purposes.