Motor
This article details how to control the included motor with the motor controller from your Pi.
All of this information assumes that you've read the Adding your first interaction tutorial and you understand it thoroughly, since this page only gives you the necessary code to run to turn on and off the motor.
Wiring
Source files for this diagram are available here.
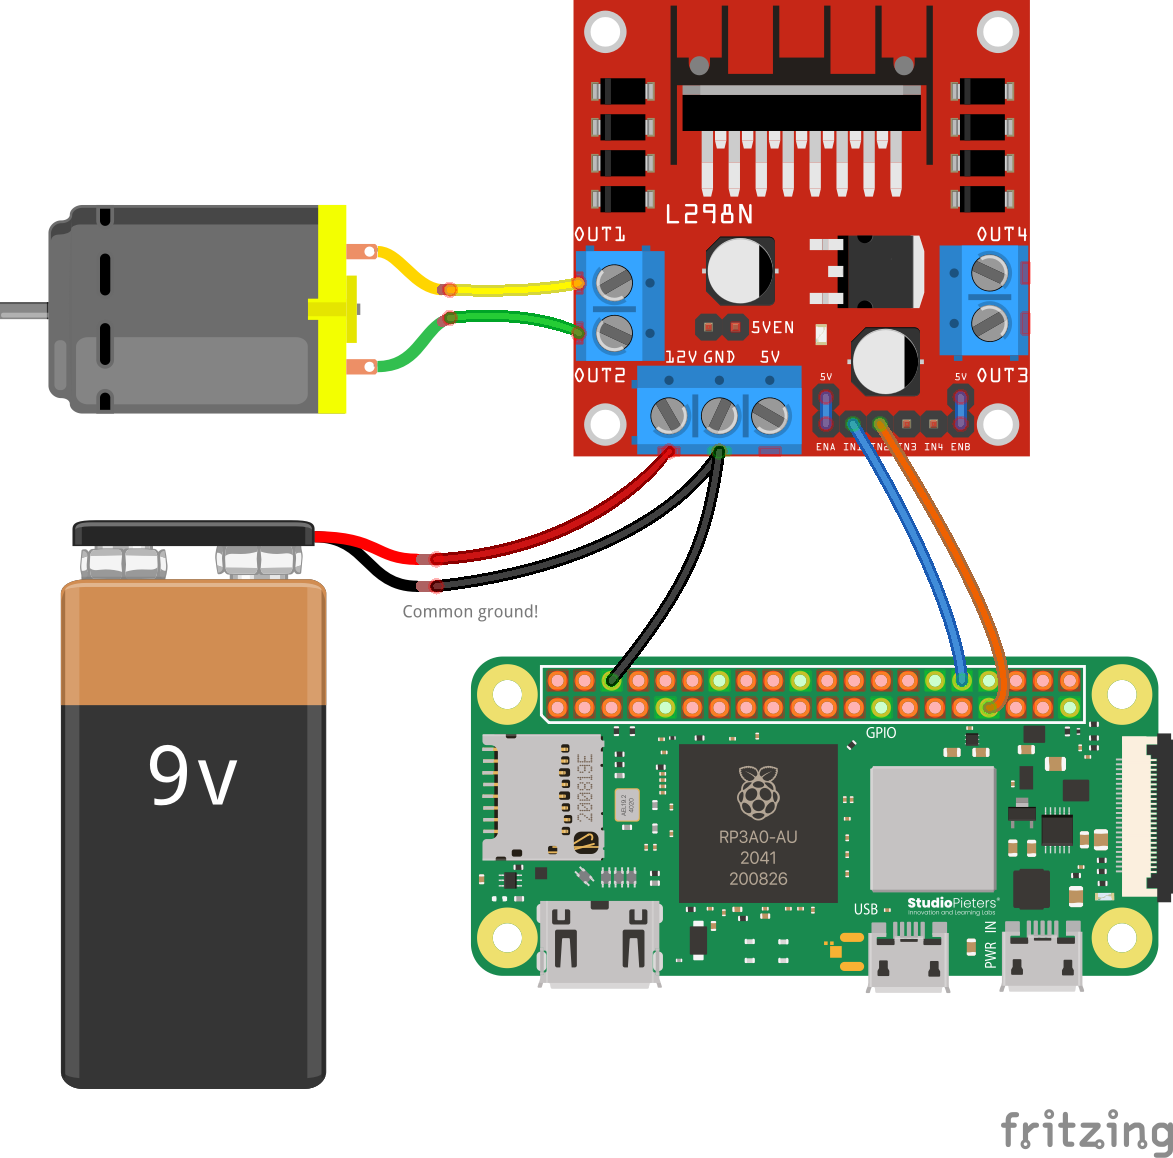
The wiring for the motor is significantly more complicated than that for other challenges. Be careful when wiring! If you need help, please reach out to competition administrators.
Code
The code for this is relatively simple, as all we're doing is turning the pins on and off. For this reason, there's no external library we're using besides the built-in Raspberry Pi GPIO library:
import RPi.GPIO as GPIO

# First, we define our two output pins that the motor controller is connected to.
IN1 = 12
IN2 = 13

# Set the GPIO numbering mode so that it knows how we're referring to the pins
GPIO.setmode(GPIO.BCM)

# Set up the GPIO pins as output
GPIO.setup(IN1, GPIO.OUT)
GPIO.setup(IN2, GPIO.OUT)

# Now, we define three functions to help us set the motor's state. These should be pretty self-explanatory.
def motor_forward():
    """Turns the motor forward"""
    GPIO.output(IN1, GPIO.HIGH)
    GPIO.output(IN2, GPIO.LOW)

def motor_backward():
    """Turns the motor backward"""
    GPIO.output(IN1, GPIO.LOW)
    GPIO.output(IN2, GPIO.HIGH)

def motor_stop():
    """Stops the motor"""
    GPIO.output(IN1, GPIO.LOW)
    GPIO.output(IN2, GPIO.LOW)

# Now, to make the motor do things, for example:
from time import sleep
print("Moving forward...")
motor_forward()
sleep(3)

print("Moving backward...")
motor_backward()
sleep(3)

print("Stopping...")
motor_stop()
sleep(3)
# Easy peasy!
Remember that you should call these functions from some sort of interaction with Socket.IO, as outlined in the Adding your first interaction tutorial.
Troubleshooting
Motor not spinning? Run through this quick checklist:
- Check Wiring: Compare your setup closely with the diagram above. Ensure screws on the terminal blocks are tight and jumper wires are fully inserted.
- Common Ground: Verify there is a wire connecting a GND pin on the Pi to the GND block on the motor controller. Without this, the Pi cannot signal the controller.
- Check Power:
- Ensure the L298N controller's red power LED is lit.
- 9V batteries drain quickly under motor load. Try a fresh battery, or try recharging the battery you currently have plugged in. The battery will have a completely standard USB-C port that you can use to charge it - just plug it into any adapter you have on hand!
- Verify Code: Ensure your code is using
GPIO 5andGPIO 6, matching the wiring diagram. - Hardware Test: Briefly touch the two motor wires directly to the 9V battery terminals. If it doesn't spin, the motor itself may be broken.
Still stuck? Reach out to competition administrators for help.
Advanced: Changing Motor Speed
Controlling the motor's speed is possible by using a technique called Pulse Width Modulation (PWM). Instead of just a simple HIGH or LOW signal, PWM rapidly switches the power on and off. The percentage of time the signal is "on" is called the duty cycle. A 100% duty cycle is the same as a constant HIGH signal (full speed), while a 0% duty cycle is the same as a LOW signal (stopped). Anything in between will result in a proportional motor speed.
To control the speed, you'll need to make a small wiring change and update your code.
Wiring
- On the L298N motor controller, you'll see a small black jumper on a pin labeled
ENA. Remove this jumper. - Connect a jumper wire from the
ENApin on the L298N to a PWM-capable GPIO pin on your Raspberry Pi. For this example, we'll useGPIO 18.
Code
The RPi.GPIO library can create a PWM signal. Here's how to modify the previous code to include speed control.
import RPi.GPIO as GPIO
from time import sleep

# Define our motor controller pins
IN1 = 12
IN2 = 13
ENA = 18 # The new ENA pin

# Set the GPIO numbering mode
GPIO.setmode(GPIO.BCM)

# Set up the GPIO pins as output
GPIO.setup(IN1, GPIO.OUT)
GPIO.setup(IN2, GPIO.OUT)
GPIO.setup(ENA, GPIO.OUT)

# Create a PWM instance for the ENA pin
# The second argument is the frequency in Hertz. 100Hz is a good starting point.
pwm = GPIO.PWM(ENA, 100)

# Start PWM with a duty cycle of 0 (motor is off)
pwm.start(0)

def motor_forward(speed):
    """Turns the motor forward at a given speed (0-100)"""
    GPIO.output(IN1, GPIO.HIGH)
    GPIO.output(IN2, GPIO.LOW)
    pwm.ChangeDutyCycle(speed)

def motor_backward(speed):
    """Turns the motor backward at a given speed (0-100)"""
    GPIO.output(IN1, GPIO.LOW)
    GPIO.output(IN2, GPIO.HIGH)
    pwm.ChangeDutyCycle(speed)

def motor_stop():
    """Stops the motor"""
    GPIO.output(IN1, GPIO.LOW)
    GPIO.output(IN2, GPIO.LOW)
    pwm.ChangeDutyCycle(0)

# Example usage:
print("Moving forward at 50% speed...")
motor_forward(50)
sleep(3)

print("Moving backward at 100% speed...")
motor_backward(100)
sleep(3)

print("Moving forward at 25% speed...")
motor_forward(25)
sleep(3)

print("Stopping...")
motor_stop()
sleep(3)

# Don't forget to clean up the GPIO pins and stop PWM
pwm.stop()
GPIO.cleanup()
With these changes, you can now call motor_forward() and motor_backward() with a speed value from 0 to 100 to control how fast the motor spins.